Friday, November 27, 2009

Smoked versus Fried Turkey -Thanksgiving 2009

This year I cooked two turkeys for Thanksgiving. They were both about 13 pounds each. I brined both using the brine solution. After the brine, they were both rinsed and patted dry to spend the night uncovered in the refrigerator. This to help achieve a crispier and less rubbery skin during the cooks.

Turkey fried using a Butterball Indoor Turkey Frryer

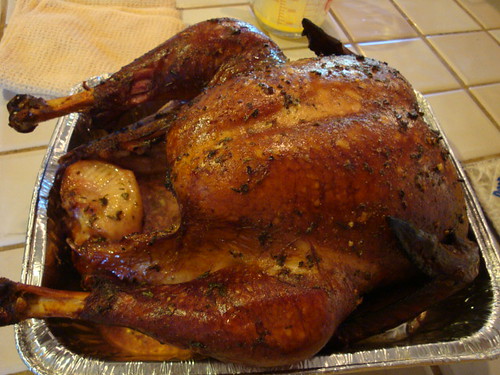
Turkey smoked in an 18 inch WSM bullet smoker


Thanksgiving morning, I first started the cooking process for the smoked turkey. I removed it from the refrigerator, injected it with a butter seasoning mixture in the breast and thighs. About a cup of injection went in. I then rubbed the outside of the bird with a butter, garlic, parsely gremolata with some added salt and cracked pepper. The bird went on the smoker at 0900. Water pan filled with water and fresh herbs from my garden- rosemary, oregano and thyme. Smoker temp 350 degrees. The temp on the smoker fluctuated from 300 to 350 degrees with lots of manual manipulations by me to maintain this temp. By 12:30 pm, the thigh temp hit 180ish and the breast was at 162. Pulled from smoker and rested til time to carve.

At noon, I turned on the Butterball Indoor Turkey Fryer for the 30 minutes it would take to reach 375 degrees. It was filled with 2 gallons of peanut oil. I previously tested the volume of the fryer using water to assure the oil would not overflow when the turkey was added. I removed the second turkey from the refrigerator and patted the inside to assure it was dry (minimizes splatter when added to fryer). I then made a seasoning mixture of salt, pepper, bay seasoning and garlic powder. This was sprinkled all over the turkey inside and out. I chose to not inject this bird and to not add any honey based or butter rubs to it as a means to not degrade the oil or cause it to burn. I then loaded the bird in the basket. At 13 pounds it did fit. I had my silicone gloves ready and a step stool. The stool so I could have better control when slowly lowering the bird into the hot oil and the gloves to keep hot spattering oil from burning my hands.. At 1:00 pm I started the cook. 52 minutes later the bird was ready. I slowly lifted it from the Indoor Fryer and placed the basket on a pan with a rack. I let it rest about 5 minutes before removing the bird from the basket. Some of the back skin did stick to the basket. That's ok because it could not be seen.

The taste test by my family. They loved them both. Each was moist, tender and perfectly cooked. The flavors were very similar dspite the different seasonings. One advantage went to the fried turkey for the skin texture, the other advantage went to the smoked turkey for the added smoky flavor. Overall they were both great in different ways.


Flickr Photo Set

Tuesday, November 24, 2009

Chicken Practice with Butterball Indoor Turkey Fryer


My practice run was to fry a whole chicken this past weekend. It actually came out very good, moist meat and crisp skin. All I did was salt and pepper it inside the cavity and the skin. My hubby was very impressed. I won't be able do my turkey til Thanksgiving day. I will be using a turkey I will brine so the moist and tenderness coefficient will be increased. The practice run gave me confidence that this fryer will do the job.

A couple of things I learned is that it will take a good 30 minutes to reach 375 degree temp for the oil. Planning ahead that is no problem. I used 2 gallons of peanut oil. The cost of the oil alone was $23.00 from my local S&F. The oil is re-usable as I did not inject the chicken with anything that would burn during the cook or degrade the oil.

After frying, the basket containing the turkey/chicken was designed to be able to drip over the fryer. I don't recommend that because the bottom of the chicken was still submersed in oil. I recommend the basket be carefully removed from fryer and let the turkey drip over a pan with a rack to allow airflow. Remove the turkey from the basket as soon as possible to assure the skin stays crispy.

Advantage over outdoor turkey fryer is the ability to cook inside. You're still dealing with a lot of hot oil so be very cautious.

I like that the fryer is not extremely huge compared to some other fryers
I have seen in the market. This increases the probability that it will not be stored until the next holiday but instead will be used for frying or steaming other meals.

I'll post more later this week on how my turkey fares.

Wednesday, November 18, 2009

Multi-Tasking Butterball Indoor Electric Turkey Fryer

I love the fall/winter holiday season. Food is the centerpiece for bringing family and friends together in celebration of the season and major holidays.

I am preparing dinner again this year. I planned my Thanksgiving menu around turkey and who isn't?. The decision then was how to prepare it- roast, fried or smoked. Actually I'm going to do two turkeys- one smoked and one fried. Why not, there are so many good sales on turkeys this week. In addition, I have a new gadget which boosts my confidence that I can safely fry a turkey and indoors.

With only one week before Thanksgiving, I am going to give this gadget a practice run this weekend by frying a whole chicken using the same technique for frying a turkey.

This is my new Masterbuilt Indoor Turkey Fryer. Though promoted as a turkey fryer, it actually is an extra large fryer, steamer, or even a boiler. The first thing I told my hubby is that I can now cook him whole large red snappers- Huachinango! Notice how this unit comfortably sits on my kitchen counter.
The cooking element accomodates oil or water. Turkey cooks for 4 minutes per pound at 375 degrees. Allow 35 minutes for oil to reach 375degrees though it will probably take less time.
The fryer basket is promoted as holding up to a 14 pound turkey or maybe the ingredients for a low country boil to feed maybe eight or just simply a whole fried chicken.
Only requires two gallons of oil to fry a turkey. Minimum of one gallon of oil for smaller cooks.
Convenient spout to drain oil from unit.


Look for my follow up on my chicken practice run.

Saturday, November 14, 2009

Hot Pot with New Ingredients To Me- "Soul Pho"

They say, "Sylvie, that sistah will cook anything". I present to you- Soul Pho, pronounced "soul fuh" or as I would say it soulful. Maybe a better name would be Pho Soul as in "for the soul" because this hot pot was comfort food full of fresh veggies, homemade broth, good protein and it brought a heartwarming vibe which soothed my inner being.

What made this sooo good was the labor and time intensive process of making the broths. Three sources which included simmering a whole chicken, simmering chicken feet and simmering beef tendons and combining the broths. These broths are combined in a Japanese Danabe Clay Hot Pot.

The recipe was "intuitive" to me. I just combined ingredients and amounts to suit what I had and my taste. Chicken chunks, thinly sliced ribeye, kale, spinach, mushrooms, onion, garlic, fresh sliced ginger, cabbage, parsley, julienned carrots and green onions. The chicken feet were used just because I saw them in the Asian grocery store and the beef tendon used as thats what I find is used in a number of Vietnamese Pho recipes. Soul Fusion combined these ingredients to make this wonderful meal.

Friday, November 06, 2009

Ziggy and the Mailman

ad hoc at home - Crispy Braised Chicken Thighs

I purchased the latest cookbook by Thomas Keller (of French Laundry fame), ad hoc at home. I am so excited to cook recipes from this book. The L.A. Times this past week featured an article on this new cookbook highlighting that these recipes are do-able at home and are not complicated master chef level or high dollar gadget needed recipes.

The first recipe I chose to do was Crispy Braised Chicken Thighs. The recipe can be found on page 30 of the cookbook. Due to copyright rules, I hesitate to include it in this post.


Why this recipe? Chicken thighs! Noted for being the more moist and better tasting part of the chicken plus I couldn't handle cooking another chicken thigh on the smoker or grill this week. Yes, thighs the preferred chicken part for BBQ comps. Braised was very appealing.


Fennel bulb sliced in 2 inch by 1/2 inch slices.


Recipe ingredients included, fresh thyme sprigs, garlic finely minced, chicken broeth, dry white wine, green olives, red pepper flakes, bay leaves, lemon zest strips, onions coarsely shopped, fennel bulb slices, flat leaf parsely for garnish.


chicken thighs, prepped with excess fat and skin removed.


thyme sprigs, lemon zest strips, bay leaves, red pepper flakes


onions and fennel strips


Chicken thighs browning. This is done prior to fennel and onion .


Brown chicken breast skin side and then sear meat side. Place on draining rack.


chicken thighs on draining rack.


Onions and fennel. Onions cooked til translucent.


Finished prep with chicken skin blow torched to crispness.